Adobe Illustrator - Script Export Artboard to iOS App Icons
Here's an Illustrator automation script to export an artboard to all the sizes needed for iOS apps. The Script includes exports for iPhone 6 and iPhone 6 Plus. You can grab the script here --> SaveIconsForiOSIcons
Script Exports:
- 120 x 120px - iPhone Icon (iPhone 4s, 5, 6)
- 180 x 180px - iPhone Icon (iPhone 6 Plus)
- 76 x 76px - iPad Icon (iPad 2, iPad mini)
- 152 x 152px - iPad Icon (iPad, iPad mini)
- 512 x 512px - AppStore Icon
- 1024 x 1024px - AppStore Icon
To install the script, depending on your Illustrator version and OS, go to "Program Files\Adobe\Adobe Illustrator\Presets\en_US\Scripts\" and just put the script there. Then launch Illustrator and you can find the script under File --> Scripts.
The script is based and expanded upon jeremieweldin's script https://gist.github.com/jeremieweldin/577775.
[FIX] Scaling Smart Objects With Nearest Neighbor in Photoshop
I've been creating a lot of pixel art lately and started to use Smart Objects in Photoshop to increase my productivity and layer organization. Scaling pixel art in regular layers is pretty straightforward with the "Free Transform" (Ctrl+T / Command+T) by setting the Interpolation to "Nearest Neighbor". When using Smart Objects, the Free Transform doesn't show the Interpolation setting for some reason. If you try to scale your pixel art Smart Object, it will use a Bilinear interpolation making your art all blurry and fuzzy.
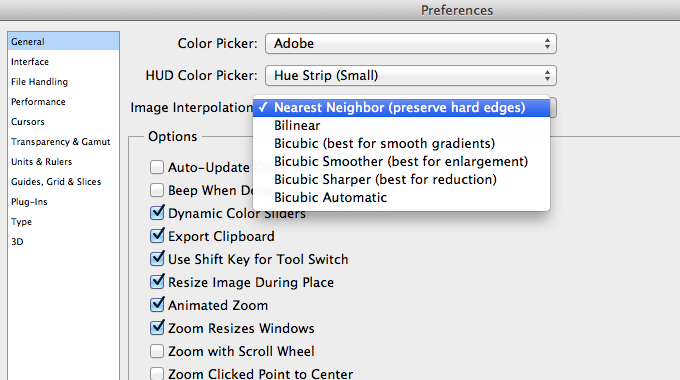
Apparently, Photoshop has a single setting to determine the scaling interpolation globally across the application. You can change this setting by going to Preferences > General > Image Interpolation. Changing this from "Bilinear" (default) to "Nearest Neighbor" will allow you to scale Smart Objects without it become blurry.

[How] Flash: Seek() & PlayHeadTime() Accuracy

Using seek() and PlayHeadTime() with FLVPlayback component of video files in Flash can be quite inaccurate. We had the same problem when we were building a prototype for our project, which involved switching and syncing of videos using specific timing. PlayHeadTime gave a decimal value, but whenever we would do a seek() using the PlayHeadTime value on a video, the timing would be off by 0.5-1 second.
Apparently, the accuracy of the seek() function is dependent on the keyFrameInterval of the video and the FPS meaning Precision = keyFrameInterval / FPS.
So for example, if you have a keyFrameInterval = 30 (1st frame will be a keyframe, 30th frame will be a keyframe, 60th frame ... etc.) and FPS is set on 15, you'll only be able to seek in 2-seconds intervals of time (precision = 30 / 15).
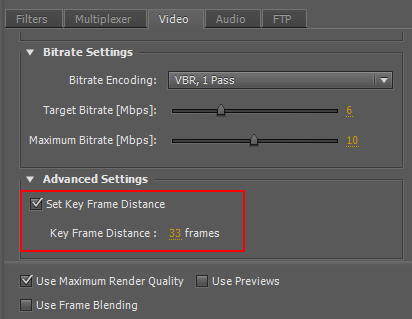
To make the seeking more accurate, set the key frame distance when exporting your video with Adobe Premiere. This option can be found in the "video" tab, "Advanced Settings", check "Set Key Frame Distance" and set the key frame distance lower. Export it and now your seek() accuracy would be more precise!

[How-to-Fix] Bold / Italic not showing in Epubs
Making Epubs is a pain in the ass. You can't just convert a PDF into an Epub that can be used effectively for e-readers as it requires style formatting and further editing. One thing that was super annoying was that Bold & Italic text wasn't showing properly. The Epub worked fine in Adobe Digital Editions, but the font style didn't show up correctly in Calibre.
One way to fix this is to manually dig into the Epub and change the CSS (rename the file's extension from .epub to .zip or .rar -> open it -> find "template.css" -> edit the CSS in an editor such as Dreamweaver -> save -> rename file extention back to .epub). This option is very tedious and sensitive to errors, but it does the job.
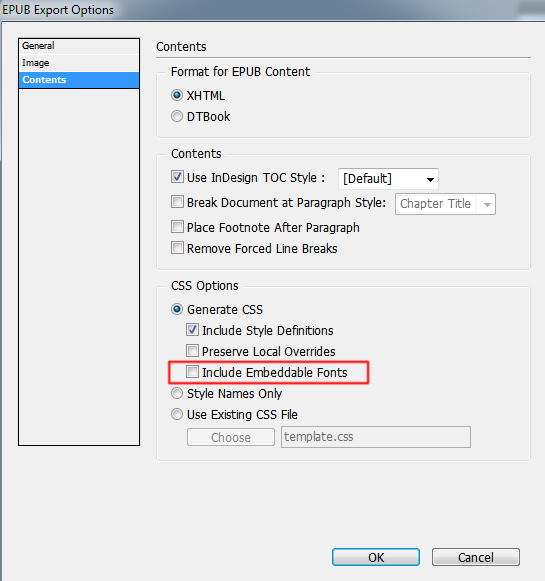
Later I found out it could have been fixed way easier... Upon exporting your Epub in InDesign, go to the Contents tab and Uncheck "Include Embeddable Fonts". This is very counter intuitive as you might think you would want to embed any fonts for it to be able to display your fonts properly.

Anyway, easy fix... took me hours to figure out... hopefully I can save someone some headaches :)

[How] Premiere: Avi File; No Video, Only Audio

Herpderp! I had some trouble importing AVI files to Adobe Premiere. It would only import the audio file and not the video. Same thing in Windows Media Player; no video, only audio, but it worked fine when I opened the file in VLC. Frustrated, tried to convert it to other formats, changing file extensions, installed additional codecs... nothing worked!! After 30 minutes of screwing around I figured it out.
The video was recorded using Fraps at my school, but I was editing the video at home and I didn't have Fraps installed. Apparently, videos recorded by Fraps sometimes require the FPS1 codec from Fraps. So Installing Fraps would also install the FPS1 codec. After that the video worked in Windows Media Player and worked in Premiere!! Yaaaaay!!

[How-to-Fix] Working with InDesign to export ePub

I started working on an eBook with InDesign a few weeks back. InDesign has an option to export your document to an ePub file which can be used for eBook readers. If you don't have a reader to test it on, you can download the Adobe Digital Editions on your computer for free! Or even better... Use Calibre to manage your ebooks or test your epubs on virtual devices!
Anyway, exporting to ePub is quite easy, but you need to pay attention to how you format your documents. For example, page layouts are different, page breaks and returns aren't included, fonts paragraph/character styles, etc. I found a very nice guide from CreativePro, which explains these problems and gives you solutions on how to fix it :D
Indesign ePub Guide Part 1 | Part 2
The most annoying thing however, is that InDesign (CS5.5) doesn't export your table styles. The guide suggests manually editing the CSS file after exporting, which is a pain in the ass. To do this, export your document to ePub. Rename your file from .epub to .zip. Open the file and locate the CSS file.
It's a drag... but it's the only solution that I could find on the web until Adobe fixes this in the new CS version.
Premiere CS5 Blue Lines
 I rarely use Adobe Premiere. A week ago, I made some animation clips in Flash and wanted to stitch them together in Premiere. Editing the video went all well, but when I tried exporting the movie it created these blinking blue lines in my video :S
I tried exporting it as .mov, .wmv, H.264, .avi, etc. but nothing worked! :@
What did remove the blue lines was was exporting my video as MPEG-2. But then the interlacing was screwing up my video. Turning off the interlacing lowered the quality so much that it really looked like crap....
Finally, I figured out that the problem was the discrepancy of the FPS between my source videos and the exported video file. My Flash animations were in 30fps while the video exported in Premiere was 25fps.
I changed it in Flash, exported the final video with Premiere and there no more blue lines and the interlacing wasn't a problem :D :D The video is done and will be posted really soon!!
Another solution is to put a title over the flashing video and set the opacity to 0, it forces Premiere to re-render the area.
Hope this post will help and save someone some headaches :)
Flash AS3 TextField buttonMode
It got so frustrated when the mouse cursor didn't change into a hand-icon when I do a MOUSE_OVER event over the MovieClip containing that TextField with "buttonMode = true;"
Apparently, the TextField class in AS3 doesn't contain the buttonMode property. The cursor does change into a hand whenever I scroll over the MovieClip, but turns back to the default cursor if I'm moving over the TextField :@
Luckily Google saved me some headaches!
To get round this simply use the "mouseChildren = false" property on your Sprite/Movieclip button.
mc.buttonMode = true;
mc.mouseChildren = false;
Source: http://www.adenforshaw.co.uk/?p=168