[How] Flash: Seek() & PlayHeadTime() Accuracy

Using seek() and PlayHeadTime() with FLVPlayback component of video files in Flash can be quite inaccurate. We had the same problem when we were building a prototype for our project, which involved switching and syncing of videos using specific timing. PlayHeadTime gave a decimal value, but whenever we would do a seek() using the PlayHeadTime value on a video, the timing would be off by 0.5-1 second.
Apparently, the accuracy of the seek() function is dependent on the keyFrameInterval of the video and the FPS meaning Precision = keyFrameInterval / FPS.
So for example, if you have a keyFrameInterval = 30 (1st frame will be a keyframe, 30th frame will be a keyframe, 60th frame ... etc.) and FPS is set on 15, you'll only be able to seek in 2-seconds intervals of time (precision = 30 / 15).
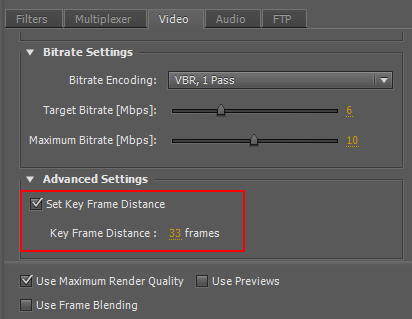
To make the seeking more accurate, set the key frame distance when exporting your video with Adobe Premiere. This option can be found in the "video" tab, "Advanced Settings", check "Set Key Frame Distance" and set the key frame distance lower. Export it and now your seek() accuracy would be more precise!

Premiere CS5 Blue Lines
 I rarely use Adobe Premiere. A week ago, I made some animation clips in Flash and wanted to stitch them together in Premiere. Editing the video went all well, but when I tried exporting the movie it created these blinking blue lines in my video :S
I tried exporting it as .mov, .wmv, H.264, .avi, etc. but nothing worked! :@
What did remove the blue lines was was exporting my video as MPEG-2. But then the interlacing was screwing up my video. Turning off the interlacing lowered the quality so much that it really looked like crap....
Finally, I figured out that the problem was the discrepancy of the FPS between my source videos and the exported video file. My Flash animations were in 30fps while the video exported in Premiere was 25fps.
I changed it in Flash, exported the final video with Premiere and there no more blue lines and the interlacing wasn't a problem :D :D The video is done and will be posted really soon!!
Another solution is to put a title over the flashing video and set the opacity to 0, it forces Premiere to re-render the area.
Hope this post will help and save someone some headaches :)
Away3D - Transparent Planes
I saw that my blog had some search hits for Transparent Planes in Away3D. So if anyone is still looking for it, here's the code to create a transparent plane. Hope this helps! :)
var matBlank:WireColorMaterial = new WireColorMaterial(0xFFFFFF);
matBlank.alpha = 0;
matBlank.wireAlpha = 0;

var plane:Plane = new Plane({material: matBlank, width: 200, height: 200});
Away3D - Outlining Hotspot on 3D Plane Image
[swfobj src="http://elwinlee.com/flash/outline/TestImageOutline.swf" width="546" height="400"]
I'm learning Away3D at the moment instead of PaperVision3D for a project at the HITLab. PaperVision is kind of outdated and the latest version was causing trouble for creating interactive panoramas.
In the example above;
- Rotate the view by clicking the background and drag the mouse.
- The bidoof is the hotspot and will change color when pressed.
- Outline moves along the z-axi when tilted to show the 2 separate layers (background & hotspot).
The idea behind this is to create an actual outline of the hotspot on the panorama picture instead having an image (e.g. arrow) overlapping the background image to indicate a hotspot.
To achieve this, I placed 2 planes; background and hotspot, on top of each other. The hotspot image is a cutout of the background image with a transparent background. The images are then mapped onto the planes and placed on top of each other accordingly. Flash ignores the transparency in the hotspot image, so placing the image on a plane wouldn't effect the image.
Next apply a "GlowFilter" to the hotspot image, set the strength to a high value and set Knockout = true, to create an outline. The hotspot object might disappear when moving the camera around. To fix this, move the object slightly in front of the background, e.g. value of "0.5", which won't be visible to the viewer anyway. And set the "pushback" and "pushfront" accordingly (this saved my day!). Compile the file and tada! :D
background = new Plane( {material: BackgroundImage, width: 800, height: 600 } );
background.rotationX = -90;
background.rotationZ = 180;
background.ownCanvas = true;
background.pushback = true;
view.scene.addChild(background);

var objectGlow:GlowFilter = new GlowFilter(0xff1616, 1, 8, 8, 20, 1, false, true);
object = new Plane( { material: ObjectImage, width: 250, height: 250 } );
object.x = -158;
object.y = -65;
object.z = 0.5;
object.rotationX = -90;
object.rotationZ = 180;
object.ownCanvas = true;
object.filters = [objectGlow];
object.useHandCursor = true;
object.pushfront = true;
view.scene.addChild(object);
Flash AS3 TextField buttonMode
It got so frustrated when the mouse cursor didn't change into a hand-icon when I do a MOUSE_OVER event over the MovieClip containing that TextField with "buttonMode = true;"
Apparently, the TextField class in AS3 doesn't contain the buttonMode property. The cursor does change into a hand whenever I scroll over the MovieClip, but turns back to the default cursor if I'm moving over the TextField :@
Luckily Google saved me some headaches!
To get round this simply use the "mouseChildren = false" property on your Sprite/Movieclip button.
mc.buttonMode = true;
mc.mouseChildren = false;
Source: http://www.adenforshaw.co.uk/?p=168